How to Track Interactive Demo Attribution

Head of Growth & Product Marketing
Attribution helps your team identify which strategies drive real conversions.
It also helps them personalize their outreach — messaging should change based on who prospects are, what they’re interested in, and the content they’ve already interacted with.
Unlike other channels, interactive demo attribution is relatively easy to implement, whether you gate your demo or not.
Below, we share 6 ways to attribute your demo and some quick tips to optimize engagement. But first, a little more detail on why you should track demo attribution.
Why track attribution for interactive demos?
There are three main reasons to monitor who is going through your interactive demos and how they’re performing:
- To understand what type of leads go through your demo. Are you attracting visitors who are in your ICP? If you do, you can pay closer attention to what they’re doing in the demo and where they spend more time. If you don’t, you can work on tweaking your demo to reel in more of the audience you want to engage.
- To nurture or retarget interactive demo leads. People who go through a demo may not be ready to buy right away. But because they went through a demo, you can identify who they are and study their behavior. That data can help you tailor your follow-ups and gradually nudge users toward booking a meeting with sales with additional interactive demos and other useful content.
- To get buy in to build to build more demos. Maybe you’ve been wanting to create demos for different use cases or even build an entire demo library. Showing how interactive demos are already driving conversions can help you start that conversation with your boss or upper management.
TL;DR: All the ways you can attribute your demo
- Navattic native form or CRM embed form (recommended)
- Direct CRM integration for contacts and leads if gated, or accounts and companies if ungate
- Navattic JS to tie website activity and demo activity together using cookies
- Use UTMs to track when a lead or contact converts after your interactive demo
- Embed a custom calendar link directly into the demo
- Query strings if you’re sending demos to mass outreach campaigns
- Account-Based Engagement for ABM campaigns
If you ungate your demo
According to our State of the Interactive Product Demo research, 70% of the top 1% of interactive demos don’t have a gate. It’s easy to see why — ungated demos have a 10% higher engagement rate than gated demos.
But without a form, you’ll need another way to figure out who is going through your demos.
Our first recommendation: Navattic JS + pass in hidden UTMs (contacts and leads)
Navattic JS is a JavaScript widget that identifies cookied website visitors and passes demo events to other analytics platforms like GA4 and Mixpanel.
For example, say someone has filled out a form on your website to download a guide or register for a webinar in the past.
When they interact with one of your demos, Navattic JS can recognize that person and append their activity onto their contact/lead in your CRM.
To map identified users to your CRM:
- Go to your workspace Settings → Navattic JS.
- Toggle on “CRM Cookie Tracking” to track website visitors who fill out a form anywhere on your website.

3. Copy the snippet and add it to the head of your website.
- It will include an SDK key that is unique to your Navattic workspace.
You could also toggle on “Automatic form submission tracking” to automatically identify visitors who submit any form on your website (whether it’s a Navattic demo or not).
To identify previously unidentified visitors, use UTMs to see which net new contacts came from each interactive demo:
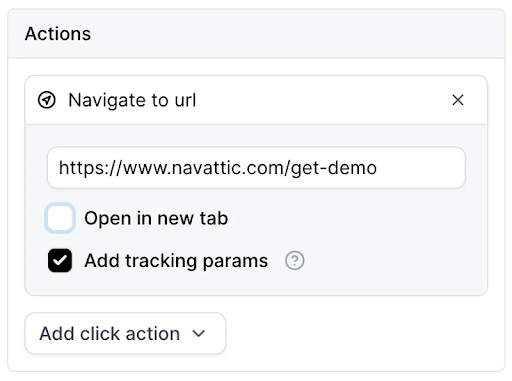
- Find a “Navigate to URL” click action within your demo.
- Check the box for “Add tracking params.”
- Add tracking params in a similar format as you have on other pages.
Example: “?utm_source={{utm_source}}&utm_medium={{utm_medium}}” would insert the present value for utm_source into this field.

Another simple option: Embed calendar links
If your team is already using a calendar scheduler like Chili Piper or Calendly, you could create a new calendar event for interactive demos.
That way, you know that any prospect scheduling a meeting through that link came from one of your interactive demos — just be sure to include “interactive demo” somewhere in the name of that link.
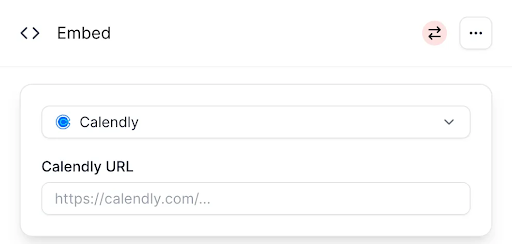
Then, embed that calendar into your interactive demo rather than linking to an external CTA. To allow visitors to schedule appointments without leaving your demo:
- When choosing your step type, select Embed > Calendly or Chilipiper.
- Paste in the new event URL.

Check out a demo of how to embed here.
Another simple option: Query Strings (for outbound or mass email campaigns)
If you’re sending out your demos widely, you might want to use Navattic’s Query Strings to identify visitors at scale.
Full Name, Email, and Company Name can be added to any demo share link as identification tokens using this format:
navattic-demo-link?attribute=value
And you can add additional attributes by adding a “&” between clauses. So, say you want to identify a recipient as Jane Doe at Navattic. The Query String would look like this:
If you’re sending one-off emails with demo links, you can set your Query Strings manually.
If you’re sending mass emails with demo links in tools like Hubspot, Outreach, Pardot, and Salesloft, append the ?user.email={{email}} query string to the end of your demo URL in any templates you create. It will look something like this:
navattic-demo-link?user.email={{EMAIL_VARIABLE}}&user.fullName={{NAME_VARIABLE}}
The platform you use will unfurl the demo URL containing the correct value.
Note: Not all platforms have the same attribute name for each variable. Check which one to use here.
Our second recommendation: Account-Based Engagement (Accounts)
Maybe your business follows more of an account-based GTM approach.
In that case, we suggest using Navattic’s Account-Based Engagement feature to (1) see who interacts with your demo and how and (2) sync that information with a CRM like HubSpot or Salesforce.
Note: You must have Account-Based Engagement* in your Navattic workspace. Once that feature is active, Navattic will:
- De-anonymize accounts visiting your website.
- Use Clearbit Enrichment to enrich firmographic information for those accounts. Each identified account will get an engagement rating (high vs. low) depending on what users did in your demo, how many unique visitors at the account viewed your demos, and the total time they spent in your demo.
From there, you can export engagement data via CSV file or push it to your CRM and create or update accounts accordingly.
You could also use Navattic’s Prospector feature to identify target account prospects by department.
*Available on Navattic Growth Plan
If you gate your demo
Form gates make it a little easier to identify who is interacting with your demos, but you need a way to make that data actionable.
Our recommendation: Hubspot form + Navattic JS
Navattic JS can connect your website activity to demo activity and send all that information to Hubspot.
Like any other Hubspot form on your website, you’ll get the most accurate HubSpot original source since it will see visitors’ website activity before they fill out the form.
Plus, with Navattic JS, you can still see Navattic custom fields and Navattic engagement in the activity timeline — without needing to use a Navattic form.
If you want to, you can embed a HubSpot form into your demo (see instructions below). Or you can just layer a regular Hubspot form on top of your demo and then tie Navattic demo activity to HubSpot activity with Navattic JS.
As we referenced in the ungated section above, you’ll need to:
- Go to your workspace Settings → Navattic JS.
- This time, toggle on “Automatic Form Submission Tracking” and “CRM Cookie Tracking.”
- Copy add the snippet to the head of your website.
If you decide to embed your HubSpot form:
- Select Embed as the step type > Hubspot Form.
- Enter the HubSpot Form ID, Portal ID, and Region (required).
Another option: Navattic form + direct integration
If you don’t have HubSpot or can’t use it for some reason, you could use a native Navattic form and then use Playbooks to send specific contacts or leads to your CRM.
Our Forms can have custom text fields, dropdowns, checkboxes, and/or multi-select options.
To create a Form:
- Go to your Navattic Workspace → Forms → Create form.
- Add fields to the form using the Default Properties or Field types.
To create a Playbook*:
- You can create a Playbook manually by selecting from default or custom audiences and actions
- You can create a Playbook automatically with our library of Templates.
We recommend using Playbook filtering to segment your visitors so that you are only sending the most engaged leads or best-fit ICPs to your reps.
*Your Workspace must have an Integration connected before you can use Playbooks.
See 6 real examples of customers using interactive demo Playbooks here.
Quick tips to optimize interactive demo attributions
If you’ve already set up your initial attribution plan, here are some ways to improve demo engagement and conversion:
- Include a CTA banner for full-screen demos. A persistent CTA at the top makes it more likely for prospects to click on it at some point during the demo. Not only does that tell you who is converting, it also helps you track how converted visitors engage with your demo.
- Include an escape view for partial-screen demos. That way, users can always view a secondary resource instead — additional clicks to track and use as clues for customizing or updating your demo or related content.
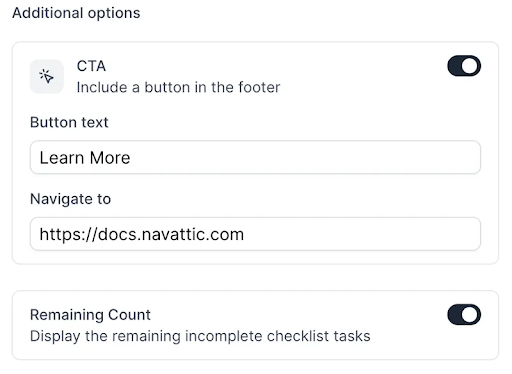
- Include a consistent CTA on a checklist demo. Again, this boosts the chances of them clicking on it. Toggle on “CTA” so the button remains in the footer of your checklist throughout the demo.

- Check step breakdown graphs. Doing this regularly helps you identify steps that are causing greater than average drop-off. These steps might have typos or reference something missing in your captures, which can confuse visitors (and make them less likely to follow through on a CTA).
- Check your benchmarks. With any interactive demo you create, you will want to track the number of engaged visitors you get, your click-through rate, and your completion rate. Comparing against typical numbers for 7, 30, and 90 days post-demo launch can help determine whether your interactive demo is performing well or needs adjustments.